
I think we all know about the goodness of multi-factor authentication (MFA), and how effective it can be at preventing malicious access to sensitive environments like an AWS account. And it seems that organizations have gotten pretty good at requiring MFA for access to the AWS console, oftentimes indirectly through a single-sign-on provider.
But in my experience, most AWS users don’t utilize MFA at the command line, or when accessing AWS via scripts or applications written directly against the AWS API. That may have something to do with how challenging it is to set up, and how cumbersome it can be to actually use it once it’s configured. In this article, we’ll walk through the process of configuring MFA for command line and API access via an IAM user, and set up our client to minimize the friction of MFA once it’s configured.
Note, we’re focusing here on configuring MFA for an IAM user. If your users already log into the AWS console as an IAM user, this will give them the ability to have equivalent functionality from the command line. If they log in via an SSO provider, and therefore operate as an assumed IAM role, you can still go this route but they’ll be operating as a different identity at the command line than at the console. In a future article, we’ll cover an alternate approach that allows them to easily authenticate as this same IAM role at the command line.
Hmm… MFA is Enforced at Authorization
When I first started to dig in on this problem, I lost a lot of time searching for a nice simple command-line equivalent to the experience I knew from the AWS console. When logging into the AWS console as an IAM user, if MFA is configured, I’m required to provide a one-time passcode in order to complete the login process.
When using MFA from the command line, the story is different. I can successfully authenticate via the command line without providing the one-time passcode from my MFA device. It’s at authorization that my access is blocked. And this happens because the IAM policies associated with my user are deftly crafted to require MFA when authorizing certain activities.
So, the first thing to understand here is that the MFA requirement isn’t an attribute of the IAM user, but rather of the IAM policies used to authorize the user. You will need to enable MFA on the IAM user — it’s needed to setup the MFA device — but you can’t stop there. You also need to modify IAM policies to validate that MFA was used at login when granting access.
Requiring MFA for All Activities
The possibly-nice side-effect of enforcing MFA at authorization is that you can require MFA for some activities and not others. But I just want to require it everywhere. I also want to take advantage of AWS managed IAM policies that aren’t written to require MFA and that I can’t modify. The easy way to satisfy both of these requirements is with a Permissions Boundary policy applied to my IAM user.
If you’re not familiar with Permissions Boundaries, they’re an extra layer of authorization that can be applied to an IAM entity to further restrict what that entity can do. Authorization is checked against the entity’s applied policies, as well as the entity’s permissions boundary, and only if both allow the action does that action proceed. In this case, I wanted a permissions boundary policy that allows all activities, but only if MFA was utilized during authentication.
To do this, I set up a new IAM managed policy, naming it something like “MfaRequired”, and used the following policy document:
{
    "Version": "2012-10-17",
    "Statement": [
        {
            "Sid": "MfaRequired",
            "Effect": "Allow",
            "Action": "*",
            "Resource": "*",
            "Condition": {
                "Bool": {
                    "aws:MultiFactorAuthPresent": "true"
                }
            }
        }
    ]
}
The condition section is the key. If MFA wasn’t present when the user authenticated, this policy will block all access.
Once the policy is created, update the configuration of your IAM user, specifying this policy as the permission boundary. From that point forward, all commands will fail if the user hasn’t been authenticated via MFA.
Enabling MFA for an IAM user
The next step is to enable MFA for your IAM user. If you’re already using MFA to allow IAM users to login via the AWS console, you can skip to the next section. If not, you’re first going to need an MFA device. These are sometimes physical devices you carry with you, but in my experience they’re usually an app on your phone. I use Google Authenticator for mine, but there are many options.
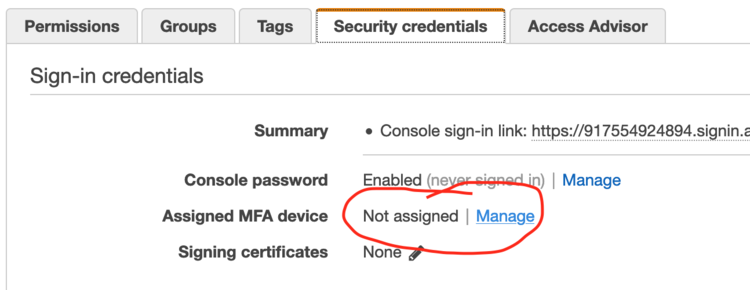
IAM users must be configured with an MFA device (physical or virtual) that is responsible for producing a one-time passcode. From the IAM user details page in the AWS console, find the Security credentials tab and click the “Manage” link next to “Assigned MFA device”. That will walk you through the process of configuring MFA for this user, including configuring an app on your phone as a virtual MFA device.
Providing MFA Tokens at the Command Line
Once you’ve got MFA configured on your IAM user, you need to start providing the associated one-time passcode at the AWS command line. It’s important to understand the process here. You don’t just add another parameter to your command line commands. Instead, you authenticate a new session (providing your MFA token in the process), which gives you a new set of temporary credentials. You then use those temporary credentials for subsequent commands.
To authenticate a new session, use the “get-session-token” sts command (or the corresponding API if you’re doing this programmatically). This command takes 2 parameters: the identity of the MFA device, and the current token from the device. It’ll look something like this:
$ aws sts get-session-token --serial-number arn:aws:iam::123456789012:mfa/doug --token-code 123456
What comes back is a mess of json that includes the AWS_ACCESS_KEY, AWS_SECRET_ACCESS_KEY, and AWS_SESSION_TOKEN. You need to capture these details and store them where they’ll be found for subsequent activities, typically in environment variables. If you aren’t familiar with how the AWS command line and APIs find credentials in environment variables, here is the documentation.
So, configuring environment variables for new session tokens might look something like this:
$ export AWS_ACCESS_KEY_ID=AKIAIOSFODNN7EXAMPLE
$ export AWS_SECRET_ACCESS_KEY=wJalrXUtnFEMI/K7MDENG/bPxRfiCYEXAMPLEKEY
$ export AWS_SESSION_TOKEN=FwoGZXIvYXdzEOr//////////wEaDF36x20Zn8ITpv9tbCKBAS0skSLtdiYW5GXKb+RX4w4MHYgq+nBUuc145UAk+6VGjpTEcn6Y+7b1W6G8GDBtn6Cd9/kZO50WIPnNT1Zeq2exCiq0AnHwY04f4YT5wQGH+0EhOuTIl3FMkDIZq1CWJYNjqg+xzN51TQ7BdC59lwjq3GyErslaBcDeFGdT1S3EASjzseL1BTIoyENXejg9wTb7QWw/RwvfCiVPpccB0gAjMGKAw33lId3MetljY1aX5A==
In summary, we have 1 convoluted command to get temporary session credentials followed by 3 convoluted commands to store them in environment variables so they can be used. There has to be a better way.
Using aws-vault for Credential Management
If you’re using MFA via IAM roles, the aws command line includes some nice functionality to handle temporary credentials for you. But here we’re using IAM users, and they don’t provide the same functionality for IAM users (which might be a hint that Amazon would prefer we use IAM roles).
Luckily, the fine engineers at 99designs have open sourced a tool (aws-vault) for securely managing your AWS credentials. The tool’s primary function is to take creds out of the ~/.aws/credentials file on your filesystem and store them securely in the system credential store of your operating system. But it also handles MFA, which is going to make our lives easier here.
aws-vault understands the AWS command line’s config file, and looks there for details such as the serial number of your MFA device. The first thing to do is update ~/.aws/config to create a profile that includes the mfa_serial configuration. Mine looks like this:
[default]
region=us-east-1

[profile doug]
mfa_serial=arn:aws:iam::123456789012:mfa/doug
Next, store the AWS_ACCESS_KEY_ID and AWS_ACCESS_SECRET_KEY for your IAM user in the secure store managed by aws-vault. This assumes you’ve installed aws-vault… that prior link has good instructions.
$ aws-vault add doug
Enter Access Key Id: ABDCDEFDASDASF
Enter Secret Key: %%%
From here, launch the aws command line, or any other programmatic access to AWS, by first invoking aws-vault. aws-vault will handle all credential management for you, including prompting for your MFA token.
$ aws-vault exec doug -- aws ec2 describe-instances
Enter token for arn:aws:iam::123456789012:mfa/doug: 123456
aws-vault creates the temporary session, stores the credentials in environment variables, and then invokes the specified command. In this case, it invoked aws ec2 describe-instances.
aws-vault caches these temporary credentials, so you don’t have to specify your MFA token again until your temporary session expires. But invoking every aws command by first specifying “aws-vault exec doug –” is a lot of typing. If I’m going to be doing a lot in the command line, I use aws-vault to launch a new shell, and then invoke the aws commands directly:
$ aws-vault exec doug -- bash
bash$ aws ec2 describe-instances
Recently I got tired of even typing that command, so I added an alias to my shell’s initialization script, giving me quick access to an MFA-authenticated shell anytime I need it.
alias aws-doug="aws-vault exec doug -- env PS1=\"aws-doug> \" bash"
With that in place, I can simply type “aws-doug” at a shell prompt to launch a subshell where all commands will be pre-authenticated via MFA.
And that’s what it takes! It took me a couple hours to get this working correctly – hopefully this write-up makes it significantly easier for you!
